My current (and first!) shack is the culmination of a lot of research, gathering opinions from fellow hams with much more experience than I, and doing the best I could to both avoid getting gear I would regret, but also buying quality tech that would give me plenty of advancement potential as I grew deeper into the hobby.
Exterior
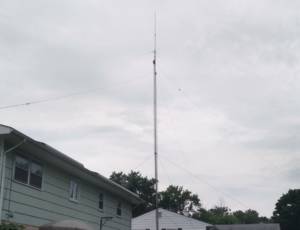
 For my first mast, I went with a Rohn H50. A push-up mast that is a modest 43’ fully extended, it allowed me the flexibility to adjust the height as needed due to antenna height restrictions due to power lines bordering my property, and its relatively lighter weight meant for a somewhat easier one-man install. I currently have 4 of the 5 total sections extended most of the way, and to ensure greater stability, drilled out the stock holes to accommodate galvanized carriage bolts and nuts with anti-sieze.
At the top of the mast is a Diamond V2000A tri-band VHF/UHF antenna. Usable on 6m/2m/70cm, it’s my ragchew outlet to the local region on the 2-meter net, and a handy way the folks from my radio club and I get together to troubleshoot random issues with HF, digital modes, CW keyers, and what have you. My current 2-meter rig is only a dual-bander right now, so I haven’t done anything on 6-meters yet.
Below the Diamond, at around 33’ or so, is the much-lauded EFHW 80-10. I love this antenna! A 130’ long end-fed half-wave dipole, the EFHW is good for multiple bands, including 80, 40, 30, 20, 17, 15, 12 and 10 meters. A pretty affordable option for those starting out in HF, too! I’ve been able to blanket the U.S.A. and the EU with this thing, and have even made some Asia, Africa, and Oceanic contacts with it on JT65. HF digital modes (along with CW) seems to be the direction I’m heading in, and this antenna will definitely give me the room I need as I further explore the hobby.
Underneath the EFHW, I mounted a pulley for 3/16” dacron so I can run up a variety of homebrew dipoles. As it stands right now, I’ve yet to build a dipole I can successfully tune – whether that’s due to inexperience, improper procedures, or lack of knowledge of my other gear has yet to be determined. However, I have a bunch of precut 14 ga stranded THHN for 20, 40, and 80 meter dipole builds, along with PVC plugs, end caps, and pipe for making more. I have successfully been able to receive on both a 20-meter and 40-meter dipole I’ve made, but haven’t quite gotten to the point I can get a consistent SWR across a band yet. Soon!
At the bottom of my mast, I mounted an RCS-10L 8-position remote coax switch, mainly for antenna/dipole experimentation. Once I figure dipole-building out, the ability to give myself a little bit of on-demand directionality via dipole placement and orientation will be very beneficial, until I get to the point I’m looking at rotators and either a hex beam or log periodic dipole.
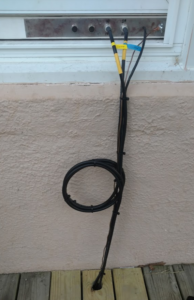
 Finally, the interconnect between my outside stuff and inside stuff – a homebrew window pass-through I’m fairly proud of. Not much to look at, but it’s secure, functional, and most important of all – works! The build was pretty simple, but I tried my best to dress it up a little bit; a length of 1”x3”, a 2”x18” length of stainless steel 6 gauge sheet metal, 2” SO-239 barrels, a bolt with some lock washers, nuts, and wingnuts to use to connect the interior ground bus to the exterior ground rod, and a small hole drilled through that was just big enough for the control cable for the switch. I took the extra step to chamfer the holes used to screw the stainless steel plate onto the 1”x3”, which I felt left a bit more of a professional appearance. For the first generation prototype of a homebrew pass-through, it does the job! Future revisions, however, will likely involves some RTV sealant, a drill press for straighter and truer holes, and a higher quality stainless steel or some kind of coating to keep it from developing some rust.
All exterior runs of coax are direct burial rated RG-213, and if they’re not in the air, they’re just laying on the ground under my deck.
Interior
From the feed-through, I have my 2-meter coax jumper running to a Kenwood TM-V71A dual-band VHF/UHF rig, and my HF coax jumper running to a small Daiwa 2-port coax switch. Off the Daiwa, one jumper goes to an MFJ-264 dummy load, and the other to my Icom IC-7300.
Next to the 7300 (on the right) is the control box for the RCS-10, and to the left of the 7300 is the Kenwood radio body. The faceplate is remote mounted by a 6’ length of RJ45 so it can lay on top of the monitor shelf. All the way to the left of the “shack shelf” is my Astron VS-35M linear power supply. For easier to read power values, I also installed an in-line Bayite shunt-based power monitor.
Coming soon is a WinKeyer, K1EL CW keyer/reader unit, and my next acquisition is very likely to be a CW keyer/bug of some sort. Looking into iambic paddles presently, and will very likely settle on a Vibroplex Iambic Deluxe.
A bit further out, I’ll be looking at adding an Elecraft KPA500 amplifier and a KAT500 autotuner. For now, though, I have more than enough to be dangerous, with plenty of room to explore, learn, experiment, and gain proficiency. And that’s just where I wanted to be when I initially started to research and design my shack!
